Video: Esercizi di recupero per la sostituzione dell'anca
Revisione paritaria di Dr Sarah JarvisUltimo aggiornamento di Lilly Sabri, MHPCUltimo aggiornamento 15 Dec 2017
Rispetta le linee guida editoriali
- ScaricaScarica
- Condividi
- Language
- Discussione
- Versione audio
- Aggiungi alle fonti preferite su Google
There are different types of hip replacement surgery depending on the injury, the severity of the injury and the surgeon performing the procedure. This leaflet is to be used only a guideline once you have discussed and confirmed with your surgeon and medical team that the exercises below are appropriate for you following your surgery.
The following exercises are recommended to help reduce swelling and pain, increase range of movement and strengthen the muscles around the hip joint and prevent future problems.
Playlist: Esercizi di recupero dopo sostituzione dell'anca
5 video
Recupero dopo l'intervento di sostituzione dell'anca - Gamma di movimenti
Lilly Sabri, MHPC
Recupero dopo l'intervento di sostituzione dell'anca - Gamma di movimenti
Lilly Sabri, MHPC
Lilly Sabri, MHPC

Lilly Sabri, MHPC
Recupero dopo sostituzione dell'anca - Quadricipite a raggio interno
Lilly Sabri, MHPC
Recupero dopo sostituzione dell'anca - Esercizio avanzato di rafforzamento
Lilly Sabri, MHPC
Range of movement exercises
Please remember that these exercises can only be completed once cleared with your surgeon and medical team
.
Hip and knee flexion sitting on the floor
Seduto con le gambe distese davanti a te, supporta la schiena se necessario.
Place a plastic bag under the heel and slide it towards your bottom, using your hands for support if necessary.
Slow and controlled, straighten leg back out to the starting position.
Repeat 10 times on each affected knee, twice daily.
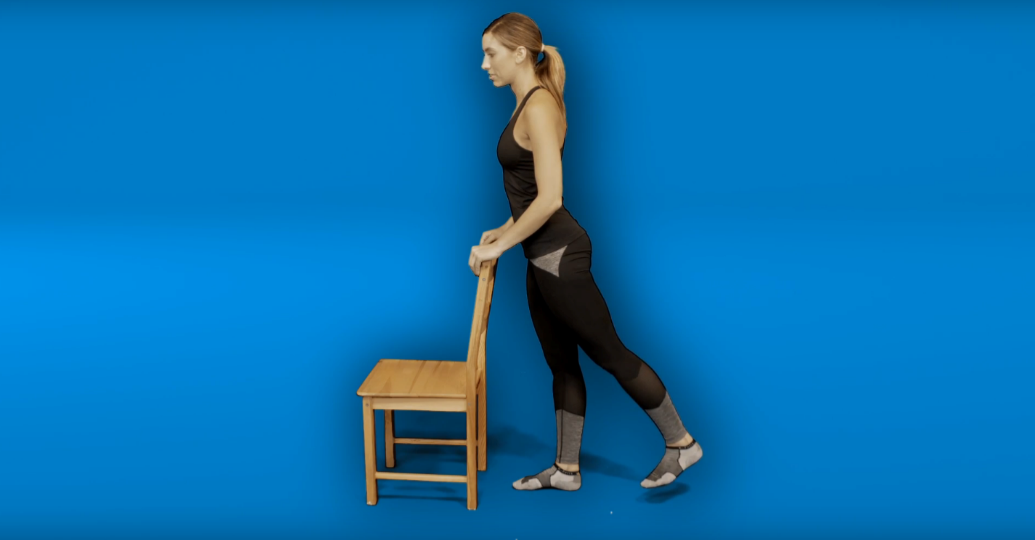
Hip flexion/extension/abduction
In a standing position, support yourself by holding on to the back of a chair.
Flexion: stand sideways on to the chair and swing your leg forward, with the toes facing up towards the ceiling. Return the leg back to the start position.
Extension: stand facing towards the chair and, with a flexed foot, swing the leg behind you and return back to the start position.
Abduction: stand facing the chair and, with a flexed foot, lift the leg out to your side and back down.
Complete all exercises 10 times, twice daily.
Stretches for the muscles of the hip joint
Please remember that these exercises can only be completed once cleared with your surgeon and medical team
.
Allungamento quadricipiti
Stai in piedi con le mani appoggiate sullo schienale di una sedia.
Piega un ginocchio e porta il piede verso il sedere.
Hook your hand around your ankle and pull the ankle closer towards the bottom to feel a stretch in the thigh muscle at the front of the leg.
Assicurati di tenere le ginocchia a contatto.
Mantieni l'allungamento per 20 secondi; ripeti tre volte per ogni lato, due volte al giorno.
Hip flexor stretch.
To simplify, either hold on to your trouser legs or place a towel or band around the ankle. This can also be completed lying on your side with the operated leg up.
Stretching dei muscoli posteriori della coscia
Sit upright in a chair with both your knees bent.
Straighten the operated leg as much as possible and flex your foot - toes to the sky
Take your body weight forward - DO NOT PASS 90° at the hip.
Strengthening for the hip muscles
Please remember that these exercises can only be completed once cleared with your surgeon and medical team
.
Isometric quads
This a simple but very effective exercise for people with very week quads (particularly after surgery).
Siediti sul pavimento, appoggia la schiena e posiziona le gambe dritte davanti a te.
Start by pushing one knee down into the ground, feeling the quad (thigh) muscle activate.
Mantieni per 10 secondi e ripeti 10 volte su ciascuna gamba, due volte al giorno.
Quadricipiti interni
Inizia sedendoti sul pavimento, appoggia la schiena e posiziona le gambe dritte davanti a te.
Posiziona un asciugamano arrotolato sotto un ginocchio.
Punta il piede verso il soffitto prima di spingere il ginocchio verso il basso nel asciugamano. Dovresti sentire il tallone sollevarsi dal pavimento.
Mantieni per 10 secondi e ripeti 10 volte su ciascuna gamba, due volte al giorno.
Sollevamento gamba dritta
A progression form the exercises above.
Siediti sul pavimento, appoggia la schiena e posiziona le gambe dritte davanti a te.
Ruota il piede verso l'esterno, spingi il ginocchio verso il pavimento prima di sollevare la gamba da terra di 10-15 centimetri.
Mantieni per 10 secondi e ripeti 10 volte su ciascuna gamba, due volte al giorno.
Da seduto a in piedi
Start sitting on a chair.
Without using your hands for support, stand up from the chair and then sit back down again in a slow and controlled movement.
Complete this exercise 20 times.
Man mano che migliori, aumenta gradualmente il numero di ripetizioni fino a 50; puoi anche provare questo esercizio da una sedia più bassa.
Squat al muro
Stai con la schiena al muro.
Posiziona i piedi alla distanza delle spalle e lontano dal muro.
Fai scivolare lentamente le mani lungo il muro mentre abbassi il corpo in posizione di squat.
Do not allow the knees to buckle in by keeping the knees directly over the middle toes.
Tieni premuto per 10 secondi e ripeti 10 volte, due volte al giorno.
If you do not have access to a wall, you can complete a standing squat, ensuring your knees stay in line with your middle toes, your weight is distributed back through your heels and your chest remains proud and open. If you get an increase in hip pain, you should stop and seek professional advice.
Static glutes
Sit on a chair with your back supported.
Clench your bottom muscles together and hold for 10 seconds. Repeat 10 times, twice daily.
Ponte
Distenditi sulla schiena con le ginocchia piegate.
With your arms relaxed down by the side of your body, push through your feet and lift your pelvis upwards off the floor; in a slow and controlled movement, lower it back down. Make sure you feel your bottom muscles active as you lift your pelvis, by squeezing them together.
Complete this exercise 20 times, twice daily.
Scelte del paziente per Chirurgia e procedure

Trattamenti e farmaci
Com'è avere una vasectomia
Subire una vasectomia può sollevare molte domande sulle implicazioni emotive, gli effetti collaterali e il reversibilità. Abbiamo chiesto a un esperto di raccontarci di più e scoprire perché sempre meno uomini nel Regno Unito scelgono di sottoporsi a questa procedura.
di Julian Turner
Trattamenti e farmaci
Com'è essere nella lista d'attesa per un trapianto di organi
Lisa Ebdon, una reclutatrice del Warwickshire, non sembra gravemente malata. Va al lavoro, porta a spasso il cane e si diverte a correre con sua figlia Lily. Come spiega, è solo quando si toglie gli occhiali che la maggior parte delle persone si rende conto di cosa sta affrontando. "Le persone sono scioccate e sorprese quando scoprono che ho bisogno di un trapianto di fegato. Poi mi tolgo gli occhiali e vedono il 'giallo' dei miei occhi," dice.
di Abi Millar
Informazioni sull'autoreVisualizza il profilo completo

Lilly Sabri, MHPC
Physiotherapist, Personal Trainer
BSc Physiotherapy, MCSP, MHPC, MAACP, MACSPM
Lilly Sabri is a chartered Physiotherapist, APPI pilates instructor, fitness, health and lifestyle influencer and founder of #LeanWithLilly.
Informazioni sul recensoreVisualizza il profilo completo

Dr Sarah Jarvis
Consulente Clinico
MA (Cantab), BM, BCh (Oxon), DRCOG, FRCGP, MBE
Dopo aver completato la formazione in medicina a Cambridge e Oxford, la Dott.ssa Sarah Jarvis MBE è diventata un medico di base.
Storia dell'articolo
Le informazioni su questa pagina sono revisionate da clinici qualificati.
Articolo disponibile anche in Inglese, Tedesco, Spagnolo, Francese, Italiano, Portoghese, Hindi, Ebraico, Arabo, and Svedese.
15 Dec 2017 | Ultima versione

Chiedi, condividi, connettiti.
Esplora le discussioni, fai domande e condividi esperienze su centinaia di argomenti di salute.

Non ti senti bene?
Valuta i tuoi sintomi online gratuitamente
Iscriviti alla newsletter di Patient
La tua dose settimanale di consigli sulla salute chiari e affidabili - scritti per aiutarti a sentirti informato, sicuro e in controllo.
Abbonandoti accetti i nostri Informativa sulla Privacy. Puoi annullare l'iscrizione in qualsiasi momento. Non vendiamo mai i tuoi dati.
Più su trattamento e farmaci
- Prenota una consulenza online con Pharmacy First
- Le persone sorde possono fare terapia?
- La ipnoterapia può aiutare l'insonnia?
- La ipnoterapia può aiutarti a perdere peso?
- La tua pelle può davvero diventare dipendente dalle creme steroidee?
- I beta-bloccanti aiutano con i sintomi dell'ansia?
- La medicina erboristica funziona davvero?
- NuovoCome funziona Mounjaro per la perdita di peso?
- Quanto è sicuro il dermaplaning?
- L'ASMR è il segreto per una beatitudine sensoriale?
- Dovrei cambiare antidepressivi?
- Il potere della nostalgia: cos'è la Terapia della Rimembranza?
- Guarigione non convenzionale: l'ascesa delle terapie alternative
- Minori di 18 anni non possono accedere a Botox e filler: è una cosa positiva?
- Cos'è la sindrome da serotonina e cosa la causa?
- Che cos'è la terapia dell'analisi transazionale?
- Com'è avere una vasectomia
- Cosa aspettarsi quando il tuo bambino inizia la terapia del linguaggio
- Dove ottenere farmaci in caso di emergenza
- Prendere antidepressivi porta davvero ad aumentare di peso?